For those of you that are trying to squeeze every ounce of performance you can from your video card to mine cryptocurrency more effectively, modifying your BIOS can prove to provide some very noticeable performance gains. Flashing your GPU can result in catastrophic failure if you do it incorrectly or the process is interrupted prematurely, so proceed with caution.
If you are looking for a BIOS for your specific GPU, check our forums. We upload them as we come across new cards.
If a modified BIOS for your card isn’t available there, you can request one here. We will ask that you upload your “original BIOS”, then will upload a modified version with the correct straps.
There a couple of tools you are going to need to get this started:
For those of you that prefer to work in a GUI, ATIWinflash has you covered. However, there are some limitations. My personal experience was that I am unable to see more than three cards using the GUI. Thus, using the command line is a necessity if you have more than 3.

Using the GUI
Let’s get started with making a backup of your card’s stock BIOS. Having a backup is important, you may want to sell your card, game with it, etc.
- Extract ATIWinflash to your Desktop.
- Right Click ATIWinflash.exe and Run as Administrator
- Select your card.
- Hit the Save Button.
Next, to flash your card with your new, enhanced BIOS
- Click “Load Image”
- Select the BIOS Image for your card
- Click Program
- DO NOT REBOOT when it tells you to
Extract AMD/ATI Pixel Clock Patcher to your desktop and run the application. This will force your drivers to ignore the driver signature Windows will most likely require. If you neglect this step, your operating system will not load the cards properly, and your system may be unstable or unusable.
Using the Command Line
Everything you can do in the GUI, you can do from the command line. In fact, it may actually be a bit easier if you have a bunch of cards in your system. If you are going to use the command line, make sure you run command line as Administrator.
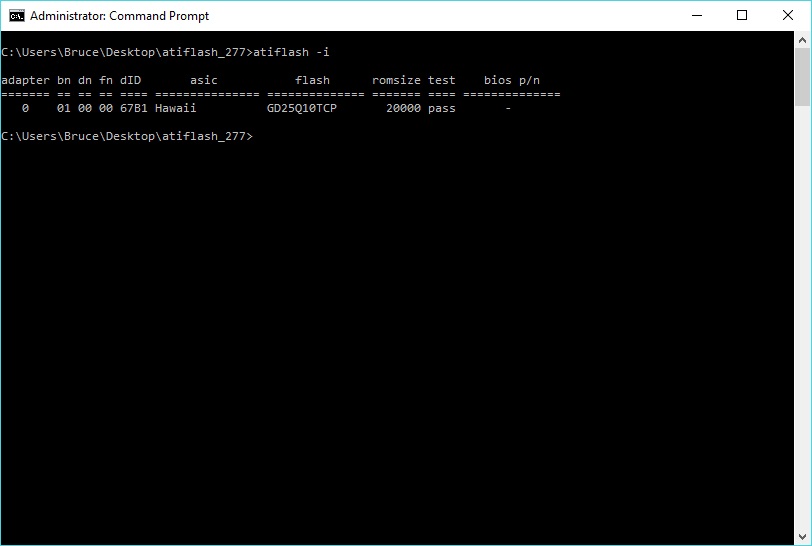
Listing your cards and their location
AtiFlash.exe -i
Saving your Current BIOS
AtiFlash.exe -s 0 backup.rom
The switch -s 0 means that you save the rom of the graphics card in PCI-E slot 0. You can use -s 1, -s 2, -s 3, etc. to choose different cards if you have more than one.
To flash your BIOS with a new rom
AtiFlash.exe -f -p 0 newenhancedbios.rom
The switch -f means force flash, and -p 0 means flashing the card in PCI-E slot 0. You can use -p 1, -p 2, -p 3, etc. to choose a different card in a different slot.
Getting Geeky
If you are curious about all the switches the ATIFlash.exe has:
Format: ATIFLASH [command] [parameter1] [parameter2] [parameter3]
[command]:

-i [Num] Display information of ATI adapters in the system.

Display information of adapter [Num] if specified.

-ai [Num] Display advanced information of ATI adapters on system.

Display advanced information of adapter [Num]
if specified.

-biosfileinfo <File> Displays the Bios info in file <file>

-p <Num> <File> Write BIOS image in file <File> to flash ROM in Adapter

<Num>.

-pa <File> Write BIOS image <File> to all appropriate adapters.

-s <Num> <File> [Size] Save BIOS image from adapter <Num> to file <File>.

First [Size] kbytes (except for Theater in bytes) of ROM content is saved if [Size] is specified.

-cf <File> [Size] [Sum] Calculate 16-bit checksum for file <File>.

Checksum for the first [Size] kbytes of the file is calculated if [Size] is specified.

-cb <Num> [Size] [Sum] Calculate 16-bit BIOS image checksum for adapter <Num>.

Checksum for the first [Size] kbytes of the ROM content is calculated if [Size] is specified.

-cr  [Size] [Sum] Calculate 16-bit ROM checksum for adapter  and compare it to the [Sum] specified. This command is the same as -cb if [Size] is specified.

-t <Num> Test ROM access of adapter <Num>

-v <Num> <File> Compare ROM content of adapter <Num> to <File>

-mi  [ID] Modify SSID & SVID in BIOS image of adapter  to . SSID & SVID in BIOS image of adapter  is displayed if [ID] is not specified.

-mb   Modify SSID, SVID, BIOS Pin Number, & Boot Message in BIOS image of adapter  to values in .

Input file example:

ssid = 715B

svid = 1002

biospn = "113-xxxxxx-xx"

bootmsg = "ATI graphic board"

-pak <File> Package an executable for BIOS update according to the commands in <File>.

Config file example:

outfile = update.exe

banner = "Update v1.0"

infile = a123.bin

command = -pa -padevid=715B infile

-isr <Num> <Build Number> <Board Number> Set ISR number based on the given build and board number if not specified, print out ISR Number

-prod <Num> <12 digit serial number> Set PROD number based on the given serial number if not specified, print out SN Number

-checkprodsn <Num> <12 Digit Serial Number> Comparing the Prod SN based on existing prod sn saved in ROM

<option/s>:

-f Force flashing regardless of security checkings (e.g. AsicID & BIOS file info check OR boot-up card).

-fa Force flashing bypassing already-programmed check.

-fm Force flashing bypassing BIOS memory config check.

-fs Force flashing bypassing BIOS SSID check.

-fp Force flashing bypassing BIOS P/N check.

-sst Use SST25VFxxx flashing algorithm regardless of ROMID straps.

-st Use ST M25Pxx flashing algorithm regardless of ROMID straps.

-atmel Use AT25Fxxx flashing algorithm regardless of ROMID straps.

-keepisrsn keep the ISR Number on the adapter when flashing a new VBIOS

-keepprodsn keep the Prod SN on the adapter when flashing a new VBIOS

-siireset Specifies the GPIO Pin to be used as the Reset when updating SiI1930 microcontroller firmware

Input example:

-siireset=7 <No Spaces>

-siiuprog Specifies the GPIO Pin to be used as the uprog when updating SiI1930 microcontroller firmware

Input example:

-siiuprog=14 <No Spaces>

-scansii Overrides normal adapter detection to enable detecting SSI roms with/without TPI firmware

-log Logs output to atiflash.log, overrides existing file

-logappend Logs and appends output to atiflash.log

-ddc Enable DDC support

-padevid=<ID> Use with -pa command to update adapters of specific device ID.

-passid=<ID> Use with -pa command to update adapters of specific SSID.

-pasvid=<ID> Use with -pa command to update adapters of specific SVID.

-pavbpn=<VBPN> Use with -pa command to update adapters of specific VBIOS PN.


